-
Clang Plugin Xcode headaches
Recently I have been writing a plugin for the Clang C/C++ compiler in order to generate code just before compile time.
This has been going fairly smoothly until I decided to create an Xcode project to allow easier breakpoint debugging with gdb.
Setting up the compiler flags was fairly straightforward, the main problems came from the linking stage.
Using the exact same linking flags as the working build script Xcode kept complaining about undefined functions such as “raw_fd_ostream” in the llvm library.
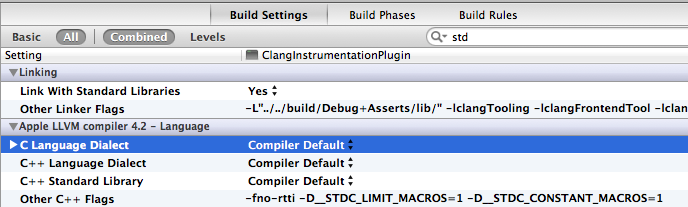
It turns out that there is an easy fix but it wasn’t clear where to look. For anyone else experiencing the same issue make sure to set the standard library settings in XCode to “Compiler Default” like so:
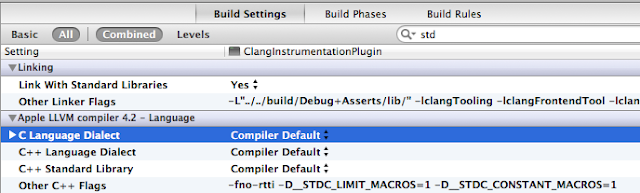
This will allow any clang plugins you are developing to compile and link succesfully :)
It is such a simple solution now but I was so sure that it was a problem in the internals of my LLVM build process that I managed to spend a whole morning getting very frustrated modifying the LLVM libraries when all I needed to do was Change those compiler settings!!
-
NES C Hello World on MacOSX
Recently I have become interested in assembly language and romhacking in general, so I thought I would try implementing a simple hello world program in CC65. I’m not intending on writing NES game in C but rather using C as a basis to try and learn assembly language programming on the 6502 processor.
First download the CC65 source files from: ftp://ftp.musoftware.de/pub/uz/cc65/snapshot/
Next open a terminal in the directory and type:
make -f make/gcc.makWait until that has finished and type:
sudo make -f make/gcc.mak installNow lets make sure it has installed correctly:
which cc65That should print:
/usr/local/bin/cc65now create a new folder called hello_world wherever you want your project to be located: mkdir hello_world
Move the include and lib folders from the source into that new directory, if you are missing the lib folder you need to download the nes library from the same ftp link you obtained cc65.
Create a new .c file called hello_world.c, for the contents I used the c code from this tutorial: http://rpgmaker.net/tutorials/227/
/*

	Hello, NES!

	writes "Hello, NES!" to the screen


	written by WolfCoder (2010)

*/


/* Includes */

#include <nes.h>


/* Writes the string to the screen */

/* Note how the NES hardware itself automatically moves the position we write to the screen */

void write_string(char *str)

{

	/* Position the cursor */

	/* We only need to do this once */

	/* This is actually 2 cells down since the first 8 pixels from the top of the screen is hidden */

	*((unsigned char*)0x2006) = 0x20;

	*((unsigned char*)0x2006) = 0x41;

	/* Write the string */

	while(*str)

	{

		/* Write a letter */

		/* The compiler put a set of graphics that match ASCII */

		*((unsigned char*)0x2007) = *str;

		/* Advance pointer that reads from the string */

		str++;

	}

}


/* Program entry */

int main()

{

	/* We have to wait for VBLANK or we can't even use the PPU */

	waitvblank(); /* This is found in nes.h */


	/* This is a really strange way to set colors, don't you think? */

	/* First, we need to set the background color */

	*((unsigned char*)0x2006) = 0x3F;

	*((unsigned char*)0x2006) = 0x00;

	*((unsigned char*)0x2007) = 1;

	/* Then, we need to set the text color */

	*((unsigned char*)0x2006) = 0x3F;

	*((unsigned char*)0x2006) = 0x03;

	*((unsigned char*)0x2007) = 0x30;


	/* We must write our message to the screen */

	write_string("Hello, NES!");


	/* Set the screen position */

	/* First value written sets the X offset and the second is the Y offset */

	*((unsigned char*)0x2005) = 0x00;

	*((unsigned char*)0x2005) = 0x00;


	/* Enable the screen */

	/* By default, the screen and sprites were off */

	*((unsigned char*)0x2001) = 8;


	/* Wait */

	/* The compiler seems to loop the main function over and over, so we need to hold it here */

	while(1);


	return 0;
}
Compile the hello_world.c to a nes rom like so:
cl65 -L .\lib -t nes -I .\include hello_world.c -o hello_world.nesDownload and install a mac nes emulator such as nestopia to test your new hello world rom!
If all went well it should show something like this:

Thanks to: mrsid from lemon64.com for compiling instructions WolfCoder from rpgmaker.net for hello world code and tutorial
-
Wacom Video Tutorial Reviews
I recently purchased a Wacom Bamboo tablet with the aim of improving my drawing skills and hopefully allowing myself to create my own custom assets for games, websites and apps rather than relying on what I can find on the web. In order to help me get the most out of my new Wacom tablet I tarted watching a number of video tutorials on the Wacom tablet. In this post I will give a brief overview of all the tutorials I watched and the main points I got out of them.
Lynda.com Wacom Essential Training
First of all the guy (John Derry) who teaches this course is really good!
He makes it very enjoyable to watch. I generally watch these videos at 2 to 2.5 times the original speed as it helps save a little time and keeps my mind from wandering when they go over concepts I already know.
Most of this course is pretty basic and many of the videos don’t apply to the limited functionality of the bamboo tablet.
The best part of this course is section 6 “Work Out with Tablet Calisthenics” where he gives a number of exercises to improve your hand-eye coordination with the Wacom tablet.
In my opinion this section alone is worth the price of the course. I need to remember to practise using these techniques on a regular basis in order to improve my ability with the Wacom tablet.
However most of the course is designed for more advanced Wacom tablets and the other information is too basic to be worth watching.
PhotoshopCafe Wacom Tablets and Photoshop
The first half of this course can be ignored if you are using a bamboo the information is too basic or irrelevant due to the limitations of the bamboo.
But the real benefit to this video course is in the second sections where the author demonstrates how he fixes various photographs using his tablet.
He covers using the clone-stamp tool, context-aware fill, faking depth of field using a blurred layer and mask and fixing shadows.
Overall the second part of this course is very interesting but not directly related to the Wacom tablet in my opinion, although it is useful seeing the settings in photoshop that can be controlled using pen pressure.
-
Using the ipad as an external monitor
One very useful application I have recently used is called
DisplayPad, it allows me to work at my laptop while moving applications such as Mail over to the ipad.I personally find this much more effective than using the built in ipad apps since more than one application can be on the screen at the same time and I can move my mouse all the way across.
I was originally using
AirDisplaybut sadly it seems to take up 100% of my CPU whenever the ipad is on rendering it unusable.Hopefully they will fix this issue as
AirDisplaygenerally seems smoother thanDisplayPad. -
Dalvik on iOS
Recently I came across the in-the-box project which aims to run the dalvik virtual machine (which is the java VM for android) on iOS devices.
They have a video showing a basic hello world example running in the dalvik vm on ios: http://www.youtube.com/watch?v=fhyd18h_as4
The code is available on googlecode: http://code.google.com/p/in-the-box/
The xcodeproject builds without problems and runs in the simulator, I haven’t tested on the actual device as my apple developer license expired a few months ago.
It is tempting to write an app in java and see if it passes the apple terms, they may have relaxed their policy on interpreted code but some apps are still rejected that execute bytecode in this manner.
I’m also not sure if dalvik uses executable memory which is definitely banned (only safari is allowed to for its javascript implementation).
Dalvik also seems like a good candidate for a very efficient scripting language for games, it is designed to run on devices with a very minimal RAM requirement and the .dex format is optimised to save space.
For more details on the benefits and optimisations of dalvik there is this very interesting google talk: http://www.youtube.com/watch?v=ptjedOZEXPM
I have been testing out the main Java API functionality and it seems to be fully functional, only started testing the Android api, at the moment I am figuring out how to implement the GUI parts of the library to be able to hopefully show some android components and eventually run a full android app on iOS and possible Mac.
First you will need to convert the android libraries to normall java class jar files, you can do this with a tool called dex2jar: http://code.google.com/p/dex2jar/downloads/list
After downloading find your “/in-the-box/InTheBoxSim/framework/” folder and for each jar file, extract it with a zip tool and run the following command on the classes.dex located in that jar file. Just run
sh dex2jar.sh classes.dexto get the output jar files in normal java class format.To compile java for testing in this iOS version of dalvik you need to pass the relevant android libraries to the javac command like so:
javac Hello.java -classpath /in-the-box/InTheBoxSim/framework/framework/framework.jar:/in-the-box/InTheBoxSim/framework/core/core.jarAfter creating a java jar file with all the classes you want we will need to convert it to the dex format to run it on dalvik.
To convert a normal jar of java classes (compiled with javac) to the dex format you can use:
dx --dex --output=DalvikClasses.jar normalClasses.jarNow just Move DalvikClasses into the bundles resources in the xcodeproject and update the “InTheBoxSim/Supporting Files/main.m” to the normalClasses.jar and the main class you want to run!
Currently i’m modifying the in-the-box files to get the android GUI somewhat working, i’ll create an update blog post when I make some significant progress.
My Popular Repositories
A Mac PDF Text To speech application for quick reading of PDF files, ideal for quickly taking notes on academic and technical papers which ProductivePDF reads the text aloud at high speeds. Too slow at reading? Find your mind wandering when reading boring documents? Find it hard taking notes? This application is for you!
Javascript implementation of the 39dll network library for GMHtml5
6502 Assembler written in python (based on asm6 by olimar)
Enigma function approval process, fork to contribute to enigma!
Example and API of Making Blogger Posts in Python
EnigmaJS html5 game development tool
Clang plugin which aims to allow dynamic instrumentation of functions with a low CPU overhead
Provides various functions to clean up Game maker games so they are able to compile with ENIGMA
Syncs Google Documents to Confluence Wiki Pages, allowing the data to be searchable on your wiki while easily editable in google docs.
Gameboy Disassembler - Convert assembled code back into Z80 assembly code